How to Expand/Upgrade the Storage of Steam Deck?
The Steam Deck is a strong and adaptable gadget that can play newly released games even though it is designed to as a small device.
The system’s space for storage can quickly be filled with large video games, programs, and other items, as is the case with most current-generation electronics. And the gamer wonders how to expand the Storage of Steam Deck.
Well, there are really easy and effective steps that are discussed in this article that you can apply to expand your steam deck storage.
There are presently three varieties of the Steam Deck available, each with a different amount of storage: 64 gigabytes, 256 gigabytes, and 512 gigabytes.
All three of these are great options, however installing big games on the entry-level 64 gigabytes model is actually more restricted. Fortunately, there is a solution that allows users to upgrade the Steam Deck and expand its capacity.
Items Required to Increase Storage on The Steam Deck
Micro SD cards are required in order to expand the storage of the Steam Deck. luckily, reports of using this to boot games have been positive.
Regardless of whether they choose 64 gigabytes or 512 gigabytes model, Steam Deck gamers need a reliable and good micro-SD card.
Micro SD cards are required in order to expand the storage of the Steam Deck. luckily, reports of using this to boot games have been positive.
Regardless of whether they choose 64 gigabytes or 512 gigabytes model, Steam Deck gamers need a reliable and good micro-SD card.
The micro-SD card by Samsung be it EVO A2 or EVO Plus or the Pro is a suggested for increasing or expanding the storage on.
It will help you expand the storage on the Steam Deck up to 512 Gigabytes and is less expensive than San Disk cards.
But installing games on the micro-SD can take longer than storing them on the SSD. If one owns a larger model, it’s perfect for holding smaller games or to emulate and play games using the Steam Deck
How to Upgrade Steam Deck Storage?
Many people wonder if it is possible that the Steam Deck SSD be upgraded? You can swap out the current SSD with the one you bought recently if your Steam Deck has run out of storage to cater your needs.
Although this procedure voids your warranty, it isn’t much more challenging than updating the SSD in the any of laptops.
Although you could install an all-new SSD in your Steam Deck, but that is not to say that you could install any drive. It must be an M.2 2230 SSD. Other drives might not fit or they are incompatible.
You might think about including Steam Deck storage if you need more room to install the games you want. You can attempt the following three techniques to accomplish this.
1. Inserting a MicroSD Card
The best and simplest way to expand the storage of Steam Deck so you can install more games is to insert a microSD card. You must format the microSD card to EXT4 to complete the procedure. Here are two practical approaches for you to complete the formatting.
- Step 1: Use a card reader to put in the SD card to the computer.
- Step 2: Install the MiniTool Partition Wizard to the computer. Then run the application to get the main screen.
- Step 3: Tap on the Format Partition which you will see on the left action panel after selecting the partition on SD card in step 2.
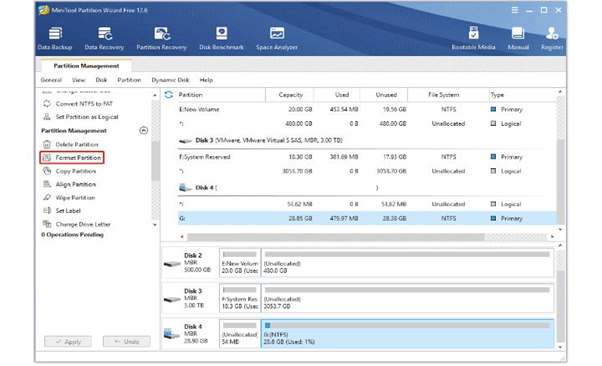
- Step 4: Choose Ext4 in the pop-up window and press OK.
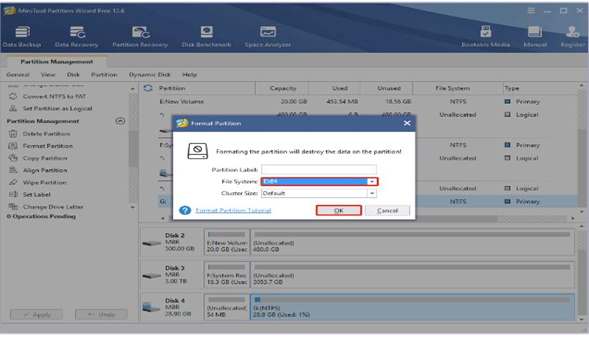
- Step 5: To complete the procedure, click Apply after that.
- Step 6: After formatting the SD card, you may utilize it as removable storage for your Steam Deck.
2. Attach a USB external drive.
For additional Steam Deck external storage, you might also try connecting a USB flash drive to the Steam Deck (using the USB Type C connector). This approach is a little trickier, though. For instance, each time the USB device is connected, you must switch to desktop mode first. Application an external hard drive is prohibited when charging your Steam Deck. Additionally, the battery will deplete more quickly.
Adding the Steam Deck’s removable storage through a USB flash drive is easy with the help of this comprehensive instruction.
- Step 1: First, remove every partition from the USB flash device. And after that, join the drive to the Steam Deck.
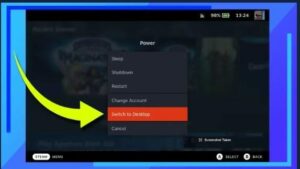
- Step 2: The second step is to select Power after that Switch to the Desktop from the main menu by pressing the STEAM button.
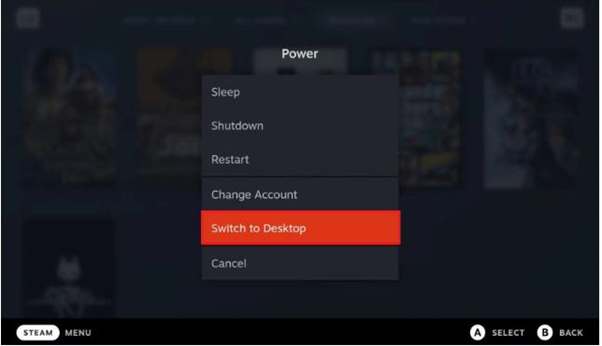
- Step 3: Select System and then Konsole from the menu. One that is done you will be prompted to generate a password in the terminal.
- Step 4: Return to System and choose KDE Partition Manager in step four. To access this partition manager, type the password in the box provided.
- Step 5: Click New from the context menu of the targeted USB disk.
- Step 6: Add a title for the partition and choose ext4 from a drop-down menu. Then press OK.
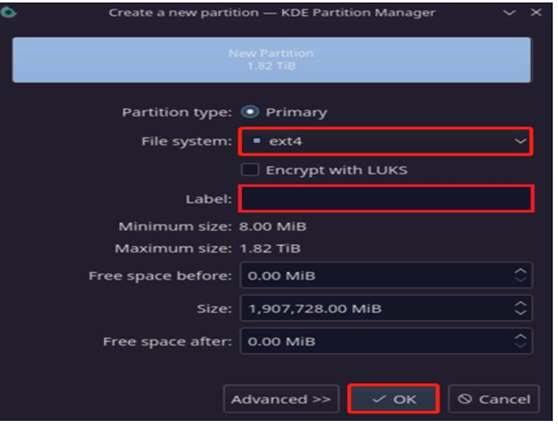
- Step 7: To complete the pending procedures, tap on Apply option given on top left. Once finished, the drive will appear in the taskbar. Click on mount and then open.
- Step 8: Enter sudo chown deck after that run then media and deck in Konsole once more. Afterward, hit Enter. With the help of this command, you may grant SteamOS permission to the USB drive by switching its ownership from root to deck.
- Step 9: Open Steam in Step 9. Then choose Settings by clicking Steam in the left corner.
- Step 10: Tap on STEAM LIBRARY FOLDERS under the Downloads options.
- Step 11: For connecting the USB drive like external storage for the Steam Deck, click the “+” symbol right next to the currently connected storage devices.
3. Upgrade your SSD for Steam Deck
Upgrading your SSD with a 2230 M.2 SSD is yet another choice for increasing Steam Deck storage. However, because it is a complicated procedure, unforeseen problems may arise. As a result, if you desire to upgrade the storage on your Steam Deck, you must proceed with extreme caution.
- Step 1: Take out all the eight screws at the back of the Steam Deck.
- Step 2: Use a plastic tool to pry open the case’s upper middle. Be very careful and don’t damage any ribbon wires or the circuit board.
- Step 3: Begin prying on every side as soon as the top separates.
- Step 4: After taking off the back of the stream deck, take out the screws holding the metal shield above the battery. then carefully take out the battery.
- Step 5: Unscrew the SSD and take out the one you are using at the moment.
- Step 6: Transfer the metal shield from the outdated SSD to the new SSD. Next, insert the new SSD into the socket and secure it with a screw. After that you are supposed to put your Steam Deck back together.
- Step 7: Generate a bootable USB drive after downloading the SteamOS recovery image. (With minimum of 8GB storage).
- Step 8: Attach the Steam Deck to a bootable USB drive. After that turn off the steam deck. When you hear a chime, together press and keep holding the Power and Volume decrease buttons. You’ll have to access to Boot Manager as a result.
- Step 9: Choose EFI USB Device in Boot Manager after entering.
- Step 10: You will then boot into the Recovery Environment after roughly a minute of waiting. Simply choose Steam Deck Re-image.
Watch Video to Easy Upgrade Steam Deck SSD
Once you’re done you can enjoy more storage capacity to download games with the new SSD.
Conclusion
You can store more games on hand by increasing storage of your Steam Deck, which keep you from running out of games that you would like to enjoy and enabling you to download a large game very easily and efficiently.
Playing games from a secondary storage space improves performance because it frees up space on the primary storage.
You can now have additional games in your library because now you have an idea on how to expand the storage of your Steam Deck. Further more you can also install custom boot animation on steam deck to improve your gaming experience.
FAQs for Upgrading Steam Deck Storage
How can I link up the Steam Deck to a computer?
The Warpinator application can be used to link your Steam Deck to your computer. Additionally, you may cordlessly stream games from your computer or move files using a micro-SD card, network drive or USB stick.
How do I attach my Steam Deck to my television or the monitor?
To attach the Steam Deck to the TV or monitor, one need to make use of an HDMI to USB-C adaptor. Connect an HDMI cord to your monitor to any screen, then insert the adaptor to the USB-C port of your stream deck and connect the HDMI cord with the adaptor's HDMI end.
Will a 64gigabyte Steam Deck fit?
Depending on the games you intend to play, the 64GB edition of your Steam Deck will end up filling up quickly; therefore, for those who are able to purchase it, the 256GB or 512GB editions are suggested.
How to Protect Steam Deck?
You can protect the screen by installing a screen protector and there are cases also available for better protection. Check out the best accessories for steam deck under $50.


