How to Troubleshoot Common Software Problems on Windows 10/11
Encountering software problems on your Windows 10 or 11 system? You’re not alone. Discover effective software troubleshooting solutions and expert tips in this article to improve your computing experience.
Disclaimer: This article provides general guidelines on troubleshooting software issues. Always back up your data and consult with a professional if you’re unsure about any step.
What is Software Troubleshooting?
Troubleshooting software entails identifying, diagnosing, and resolving issues affecting computer software functionality. It’s an essential skill for Windows 10 and 11 users, as software problems can vary from minor inconveniences to significant system disruptions. This process follows a systematic approach to identify the underlying issue and implement suitable solutions. It’s not solely about resolving problems, but also about enhancing your software comprehension, leading to a smoother computing experience.
How to Troubleshoot Software Problems:
1. Restart the Problematic Software
Sometimes, software issues can result from conflicts with other applications or glitches during startup. Simply shutting down the problematic program and restarting it can often resolve these issues.
2. Restart Your Computer
If restarting the software doesn’t do the trick, consider rebooting your entire computer. A fresh start can resolve system-level problems that may be affecting the software. After the restart, relaunch the problematic application to check if the issue has been resolved.
3. Reinstall the Software
Sometimes, software issues may arise due to missing or corrupted application files. Here’s what you should do:
- Completely Uninstall the Problematic Software:
- Access your computer’s control panel or settings.
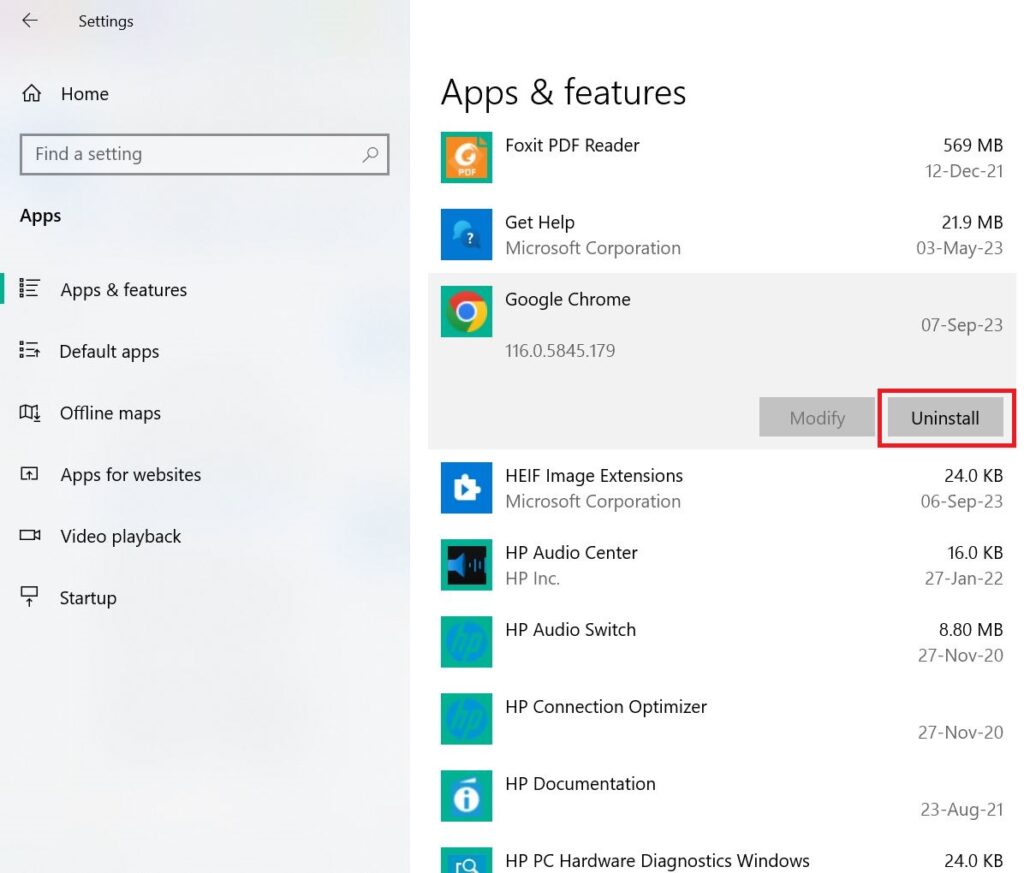
- Navigate to the “Apps & features” section.
- Locate the problematic software and select “Uninstall.”
- Follow the on-screen instructions to remove the software entirely from your system.
- Ensure No Residual Files Remain:
- After uninstalling, it’s crucial to ensure no remnants of the program linger.
- Manually inspect your computer’s hard drive, specifically within the “Program Files” or “Program Files (x86)” folder, for any remaining folders or files associated with the software.
- Alternatively, there are PC repair tools available that can scan and remove residual files from uninstalled programs. Ensure you choose reputable ones and always read user reviews before downloading.
- Before Reinstalling:
- Before reinstalling the software, visit the software vendor’s official website.
- Verify if a newer version of the software is available. Software vendors frequently release updates containing bug fixes that can address problems.
- If an updated version is available, download and install it.
- Once installed, launch the software and see if the problem persists.
4. Check Software Patches
Software vendors frequently release patches—small updates designed to address known issues. Check the vendor’s website or use built-in software update tools to ensure you have the most current version and patches, which include essential bug fixes and performance enhancements for a smoother computing experience.
5. Scan for Viruses and Malware
Malicious software such as viruses and spyware can disrupt your system, leading to software malfunctions. If previous troubleshooting steps have not yielded results, it’s crucial to take proactive measures. Use trusted antivirus and anti-malware tools to scan for and remove these threats. After scanning, restart your computer to ensure any identified threats are neutralized, restoring smooth software functionality.
6. Free Up RAM
Your Windows computer relies on RAM for optimal software performance. If you encounter a software program running slowly or becoming unresponsive, follow these steps to free up valuable RAM:
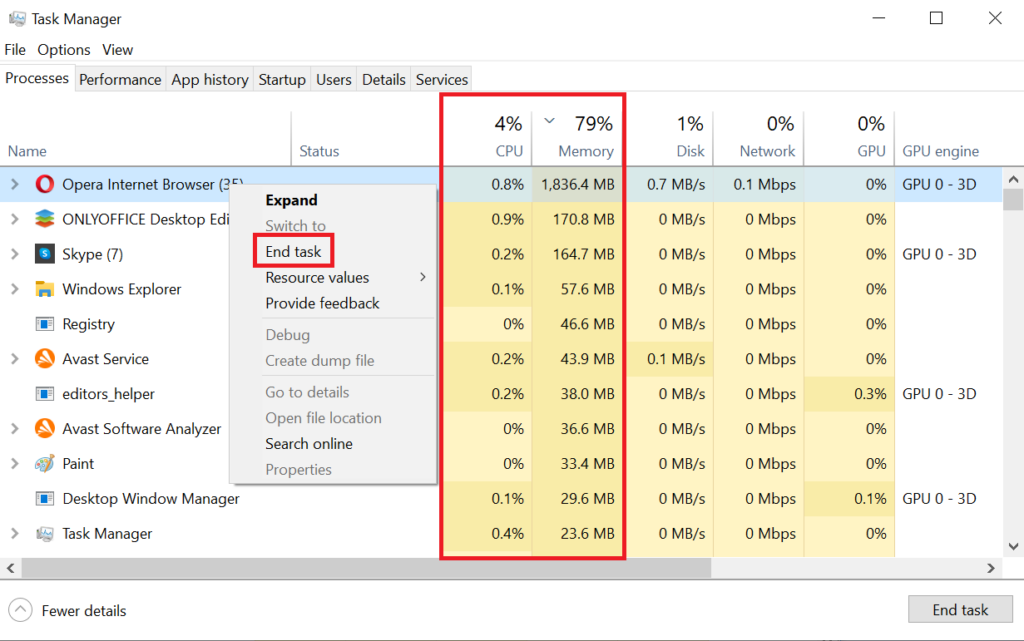
- Press Ctrl+Alt+Delete and choose Task Manager.
- Navigate to the Processes tab.
- Sort the programs by CPU or Memory usage.
- To terminate resource-intensive processes, right-click on the process and select “End Task.” Be cautious and avoid ending processes if you’re unsure about their purpose, as it might affect the system’s stability.
7. Check Recent Changes on PC
Modifications to your computer’s software or hardware setup can potentially bring about conflicts and problems. Consider the following:
- Software Conflicts: Newly installed software may clash with existing applications. If you’ve recently added new software and are facing issues, try uninstalling the conflicting program.
- Computer Settings: Examine your computer’s settings and configurations for recent modifications that might have unintentionally triggered the issue. Keep an eye on settings related to:
- Display Resolution: Changes in screen resolution can impact how software displays and functions.
- Sound Settings: Audio configurations can affect software that relies on sound.
- User Permissions: Ensure you have the necessary permissions to run certain software.
- Power Settings: Adjustments to power-saving settings might influence software performance.
- Network Settings: Connectivity settings can impact software requiring internet access.
- Hardware Conflicts: Newly added or improperly configured hardware can also impact software performance. Disconnect any recently added hardware temporarily to see if it resolves the issue.
8. Check for Firewall Conflicts
Many users employ personal firewall software to enhance security, but these firewalls can sometimes block legitimate software. If you suspect a firewall conflict:
- Review Firewall Settings: Check if the problematic software is listed as a blocked program.
- Modify Firewall Settings: Adjust firewall settings to allow the software to run.
- Test for Software Issue Persistence.
9. Explore Safe Mode
Windows 10 and 11 offer Safe Mode, a troubleshooting environment that disables non-critical applications and processes. This simplifies the task of isolating software-related problems. To enter Safe Mode, traditionally you’d press the F8 key during startup, but this might vary based on your computer’s configuration. Consult your device’s manual or support website for specific instructions.
Launch the problematic software in Safe Mode and replicate the issue. If the problem doesn’t recur, it may be related to your operating system or another installed program, rather than the application itself.
10. Optimize Your Hard Drive
In some cases, your computer’s overall performance can directly impact software functionality. To enhance this aspect, consider defragmenting your hard drive to reorganize its file structure for improved efficiency. Here’s a step-by-step guide:
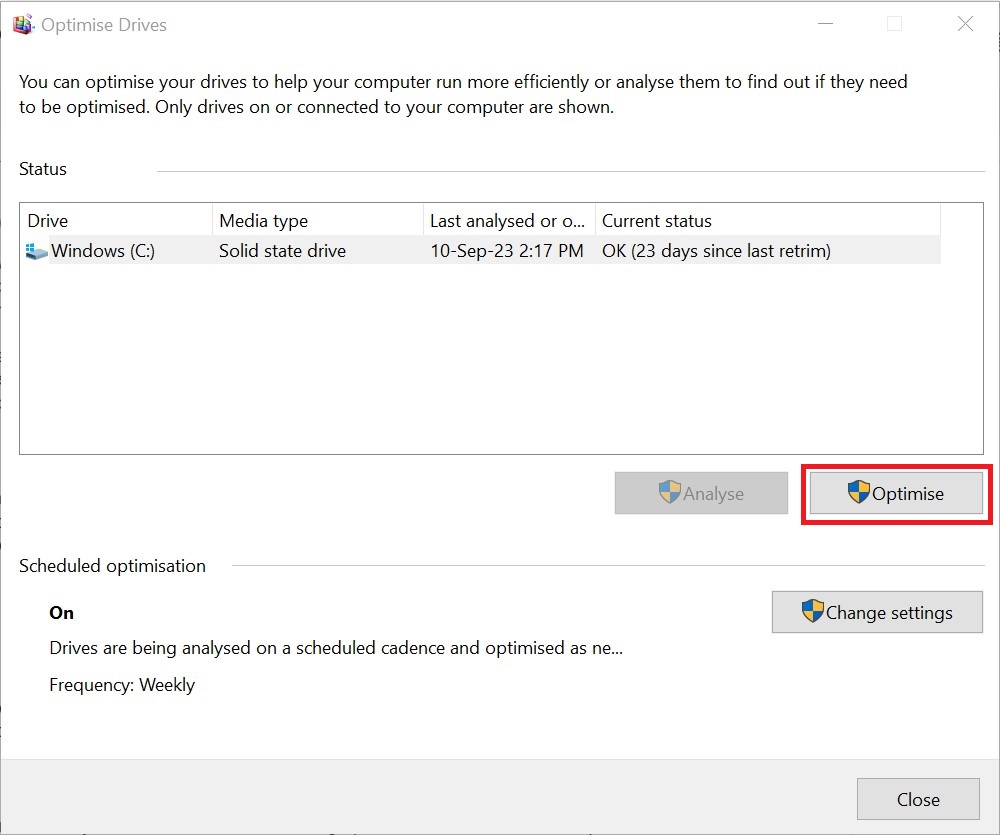
- Open the search bar on the taskbar and type “defrag.”
- Choose “Defragment and Optimize Drives.”
- Pick the drive to optimize.
- Click “Optimize.”
Keep in mind that defragmenting a hard drive can be a time-consuming process, so it’s wise to schedule this task for a time when you won’t need your computer for several hours.
11. Update Drivers
To prevent software issues, ensure your hardware drivers, particularly those for components like graphics and sound, are kept up-to-date. Outdated drivers can result in compatibility problems and software malfunctions.
Here’s how to update drivers:
- Visit the official manufacturer’s website for your hardware component. Ensure you are accessing legitimate and official websites to avoid downloading malicious software.
- Find the drivers section.
- Identify your hardware model.
- Download the latest drivers.
- Install the drivers following the provided instructions.
- Restart your computer to apply the changes.
Regular driver updates can prevent software issues, enhance system stability, and ensure peak performance.
12. Use Compatibility Mode
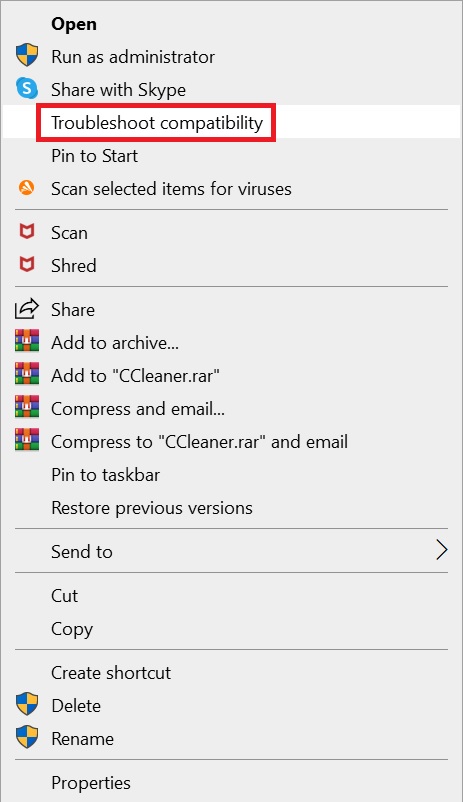
If you have older software that isn’t functioning correctly on your Windows version, try running it in compatibility mode by right-clicking the program and selecting “Troubleshoot compatibility.”
13. Check for Background Processes
Background processes and applications can consume system resources. Utilize Task Manager to identify and terminate unnecessary background processes.
14. Monitor System Temperature
Monitor your computer’s temperature using diagnostic tools, as overheating can cause software problems. If needed, clean the internal components to prevent overheating-related issues.
Conclusion
Troubleshooting software problems on Windows 10 and 11 doesn’t have to be daunting. By following these comprehensive steps, you can often resolve issues on your own. Remember to document each troubleshooting step you take, as it will help if you ever need to escalate the issue to tech support. Taking a proactive approach to solving software problems ensures that your Windows-based computer runs smoothly and efficiently.


