How to Add StatCounter in Blogger or WordPress Blog?
In my previous post I wrote about Feedjit which is a free tool for tracking traffic of your blog. Feedjit is not as advance as StatCounter.
StatCounter provides you more details and information about your visitors. It provides real time traffic details (visitor path, source, activities, Ips etc). It is very important to track all the traffic coming to your blog. Some time spammer can post spam comments in your blog and ff you have any tracking tool installed in your blog, then you can easily block his IP address. You can also track any hacking activity or adsense click boomers, if you have advanced tracking system in placed.
Blogger (Blogspt) has no feature to block any IP address, but wordpress has this feature to block any IP address from visiting your blog. You can do this in the number of ways, and one of the method is through StatCounter.
StatCounter provides you all the details about every single visitor. You can find about visior country, IP address, Browser, Operating System, Server, Host etc. You can also find Popular Pages, Recent typed Keywords in the Search Engine, Came from (Visitor Path), Exit link activity, Page Load activities and much more.
How to Install StatCounter in your blogger or WordPress Blog?
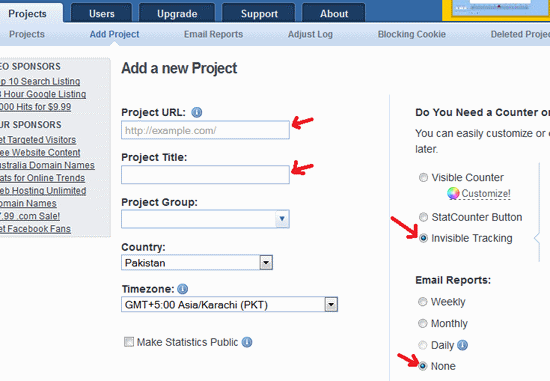
Step 1:- The process is very simple. Visit StatCounter and create a free account. Login to your account and click on Add Project.
Step 2:- Enter your blog URL, Website Title, Select your county, select Invisible Tracking and None for the “Email Reports”.

Step 3:- Click on “Add Project” button.
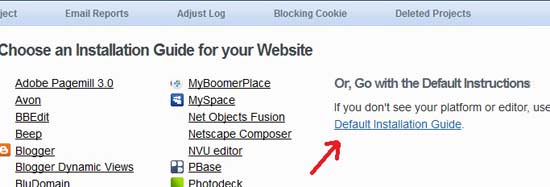
Step 4:- Click on the link “Default Installation Guide” to get the code.

On the next page, you will see a long HMTL code. Copy the code and paste it in your blogger or wordpress blog.
For Blogger (blogspot)
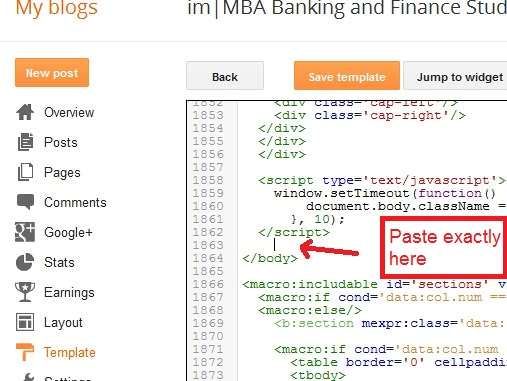
Go to your DashBoard and click on Theme>Edit HTML and then find the code </body> in your template code. [Update: The Template Button is now changed to Theme by Blogger.com]
Paste the StatCounter code just before </body> and click on Save template Button.

For WordPress Blogs
Login to your DashBoard, click on Appearance and then click on Editor. Find footer.php file.
Click on footer.php and find </body> inside the code, and paste the StatCounter code just before </body> and click on save button.
Now every visitor to your blog will be tracked, and you will find all the information in your statcounter account. Statcounter is a very useful and handy traffic tracking tool. If you found any difficulty, then post comment here. Don’t forget to backup your blogger blog and wordpress data base before making any changes.


6 comments
Laksa
Hey Bilal well I can say the new version is better, because no errors:
https://wordpress.org/plugins/sc-littlebizzy/
old plugin is just so many errors in the browser console (Chrome)
Miato
Thanks for article. Everytime like to read you.
Thank you
Miato
Bottomless
Hi there,
Thanks for article. Everytime like to read you.
Have a nice day
Bottomless
Chand
Yes for wordpress users, official statcounter plugin is also good, but a simple code is better then a plugin.
Blogsolute
For WordPress, you can use their official StatCounter plugin which makes it more easy. No need to play with code and no worry even if you change theme.
swarnaw
I agree with you, because i also used this tool for my blog, web site since 1year. this is a good tool where to come my visitor, and more. i learn one idea in your post, one visitor come my wordpress blog site and writ spam comment on my site more times a day, now i have block this user. your post is most useful for visitor, thank a lot your post.