
January 15, 2013
Recovery
Recovering Data from a Formatted SSD Drive: Is it Possible?
Data recovery remains a crucial lesson for people who handle data every day, especially businesses. However, you do not require expert skills to recover deleted or formatted SSD drives. There are currently many ways to restore lost files even with system-built features.
But SSDs store data in a very different way. The technology used in solid-state drives makes it a little bit difficult to recover deleted data from an SSD drive. We recommend you turn off the drive immediately when data is lost from it and learn more about recovering data from a formatted SSD or dive into the recovery process. The chances may be slim but with available backups, you will be able to recover your files easily.
Why Accidentally Formatted SSD May Cause Permanent Data Loss
Generally, hard drives are meant to write data to thin layers of magnetic materials. When this data is deleted or drive formatted, the data still exists as the OS only marks the spaces as “available.” However, SSDs store data electronically. The TRIM command for SSD marks invalid data and deleted files are cleared during garbage collection.
On a related note, check out External Hard Drive Data Recovery: Best Software.
The SSD garbage collection is done in the background immediately when the drive receives a TRIM command. This makes the files unrecoverable as they are physically erased.
On certain models however, the affected sector may remain readable if certain robust software is used. But this will only be possible for a short time. Dive into this guide on Samsung SSD data recovery to learn more tricks quickly before you can implement them. That is the only way you can recover a formatted SSD like a pro in future.
So, is it Possible to Recover from a Formatted SSD Drive?
Yes, you can still recover data from a formatted SSD. However, certain recommendations must be followed strictly to increase your chances. It is also important to analyze the format type on your SSD before you begin the process of recovering data from it.
You might be luckier if a quick format was the reason you lost data from the drive. This is because a quick format may leave out some partitions untouched. However, full formats will permanently delete your SSD files including rewriting the sectors. If that happens, it will be impossible to get back your files.
Recommendations To Increase Formatted SSD Recovery
Here are some of the best practices that will help increase your chances with an SSD card especially after formatting.
- Turn off the SSD immediately as the longer it operates the lower your chances of recovery. This also means you must stop using the SSD immediately after the format.
- List down key files you want to recover. This is especially important if you want to contact a professional credible data recovery company. The companies will not charge you if the data you are looking for are not recoverable. However, if an attempt recovers some files, you will have to pay for the service even if the partial attempt does not restore your main files.
- Start the data recovery as soon as possible as the longer you wait the slimmer your chances become. If you are not so sure, contact a professional data recovery provider. Otherwise, follow this guide to recover your files ASAP.
How to Recover Data from A Formatted SSD Drive
Method 1: Use Data Recovery Software

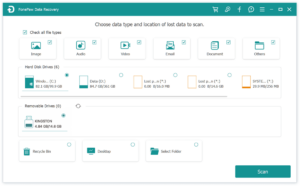
To increase your success rate with this method, you need a professional SSD recovery software like Disk Drill by CleverFiles.
Disk Drill is an excellent tool for formatted drive recovery with advanced scanning algorithms. It also comes with powerful features to support the recovery process making it the most effective solution for deleted, corrupted or formatted data. Besides, it supports various SSD types including NVMe M.2 SSDs.
Additionally, Disk Drill supports a wide range of file formats including photos, documents and audio files. We recommend you go with this method as a first priority to ensure your data is restored immediately.
Step 1: Download and install Disk Drill on your computer.
On a related note, check out using a Windows 7 system recovery disc.
Step 2: Launch Disk Drill and choose the formatted SSD.
Step 3: Scan the drive by clicking on the “Scan” icon. The tool should begin the search immediately. It begins with a quick scan followed by a deep scan which searches your SSD sector by sector to restore all the deleted files.
While the scan progresses, Disk Drill allows you to preview the recovered files. Use this option to ensure you have recovered the right data.
Step 4: Complete the recovery process once you are satisfied with the preview results. You can also wait for the full scan to end. Before you hit the “Recover” button. You will then be asked to choose a location for the recovered files. Ensure you select a safe location different from the original file locations.
You might also like our post on How to Migrate Windows SSD Data – Free SSD Migration Tool.
Step 5: Hit “Ok” to complete the process.
Method 2: Use File Recovery Tool
Step 1: Download Windows file recovery tool from Microsoft store.
Step 2: Launch the application and press “Windows Key” then type Windows File recovery” in the search box. Select Windows File Recovery.
Step 3: Allow it to make changes when prompted by tapping “Yes.”
Step 4: Enter the command “winfr source-drive: destination-drive: [/mode] [/switches] in the command prompt window.
There are two different modes users can utilize when recovering files from SSD with file recovery tools. You can use either “Regular” or “Extensive” options.
On Regular mode, you can recover the documents folder from the C:drive to a recovery folder on an E:drive using the command “Winfr C: E: /regular /n Users[username]/Documents.”
If you find this useful, our guide on recovering overwritten files on macOS goes deeper.
To recover JPG and Excel files, use “Winfr C:E: /regular/n*.jpg/n*.xlsx.”
On extensive Mode, you can recover any file with the string “Pulse” in the file name with the using substitute characters.
Use the command “Winfr E: C:/extensive/n *invoice*
To recover jpeg and png photos on the E: drive, use the command “Winfr C: /extensive / n Users[username]pictures*JPEG/nUsers[username]/Pictures*.PNG.
Note that the source and destination drives must be different. When recovering from C; drive, use the /n [filter] switches to specify the folder or user files.
Microsoft automatically creates a recovery folder called “Recovery_[date and time]” on the destination drive so you don’t need to look for a safe location.
Step 5: When prompted to continue, enter “Y” to start the recovery operation. The process will take some time and this depends on the size of your source drive. You can also stop the process midway by tapping “Ctrl + C.”
Method 3: Use a Data Recovery Service
Using professional data recovery tools such as Disk Drill are some of your best bets with data loss scenarios similar to this one. However, depending on the scenario, even the best SSD tool can fail to give you the results. This is when it is advisable to stop all the DIY data recovery and get a professional recovery service.
Here are what to consider when choosing a professional data recovery service.
- Class 100 clean room utilization
- Guarantee of data recovery
- Free hard drive shipping for recovery
- ISO certification for their service center
- Secure and dependable service
- Confidentiality of service
- Implementation of the “No recovery, no charge” policy
Tips to Secure your Data from Further SSD data loss
- Regularly backup your computer
- Think twice before formatting SSD
- Stop using SSD immediately you lose data from it
- When unmounting SSD, do it safely
- Use antivirus software to protect your data
Conclusion
SSD data recovery is possible. However, you must strictly follow the recommendations to increase your recovery chances. In most cases, high-end data recovery software such as Disk Drill will save your day.
 April 17, 2024
Related Posts


Search Here
Bilal Ahmad
Founder & Editor, TechMaish
Bilal Ahmad is the founder and editor of TechMaish, writing about consumer technology since 2008. For over 18 years he has covered streaming and downloads, games, social media platforms, iPhone and Android, Windows fixes and everyday software, testing tools hands-on and sharing what actually works. He is based in Peshawar, Pakistan.
About MeAll My ArticlesTwitterFacebookLinkedInInstagramPinterest