Add OEM Logo With Information in Windows 7 System Applet
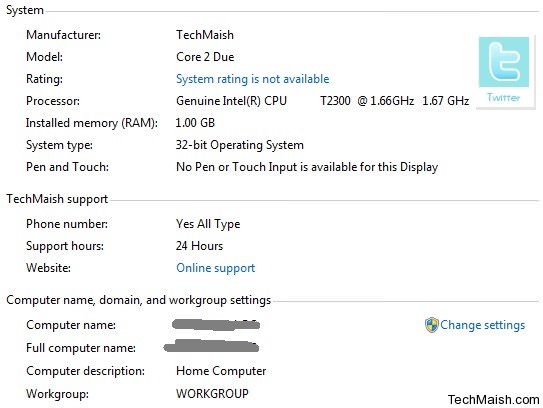
When you right click on your widows 7 and go to its Properties you see all the information about your system. These information can be changed easily from Regedit. If you change these information, it has no negative or positive effect on your system. It will not speedup windows 7 or reduce the speed, this is just a fun trick that you can apply on your windows 7. After applying the trick, the end result will be as;
 If you want to add a logo and change the information for your system in windows 7, then follow the below steps carefully. Please note that registry is a very sensitive area, so be careful when changing or adding any thing.
How to Add Logo and Information in Windows 7?
1. Click on Start Menu and type regedit in search. Open regedit.exe file.
2. Now navigate to below location.
HKEY_LOCAL_MACHINE > SOFTWARE > Microsoft > Windows > CurrentVersion > OEMInformation
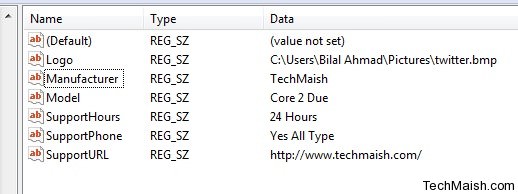
3. When you enter into OEMinformation area, you will find (Default) file and blank screen. Now you will have to create 6 String Values, in order to add logo and information.
- Right Click in the background>Click New and then String Value
- Enter the file name and its value for 6 entries (screen shot)
 Note:- When you create a String Value, Right click on it and Modify it to give the Value Data
a.) Logo = Your Logo Location (Create a logo that is 120×120 in size and save it in 32 or 24 bit .bmp extension)
b.) Manufacturer =Type the name of manufacturer you want to display
c.) Model = Type model of your computer or laptop
d.) SupportHours = How much hours your computer can support. Write any thing
e.) SupportPhone = Write your phone number
f.) SupportURL = If you have a website, then write its URL in Value Data
Its Done….
Now Right click on My Computer and Go to its Properties, you will see your logo and information added instead of the default information. Hope you like the trick, don’t forget to post comment if you found any problem.


2 comments
Anis
Fallowed aii steps did not work for windows7
Dana
Thanks for this tips. I would be great if there is my logo at my windows 7. 🙂