How to Fix a Blown Subwoofer? A Beginners Guide
A subwoofer is a perfect companion to a pair of high frequency tweeters. The former creates groovy, low bass to cover up the extreme frequency of the tweeters and give the listener a home studio like audio quality.
Although subwoofers are designed to make low frequency sounds, if the bass is kept too low for a sustained period of time, it might create some internal damage to the voice coil or the other parts surrounding it.
Unless the case is very severe, it is very unlikely that you need to buy a new set of speakers. Try going through our following guide to see if you can fix the problem and , if needed, replace something on your own. This may save you some cost.
Fixing your blown subwoofer

Before you start fixing your subwoofer, here are some things you will need –
- Multitester
- Screwdriver
- Compressed air blower
- Glue
- Sharp knife
- Soldering iron
With these items at hand, start following the steps below
Step 1 – Check your voice coil
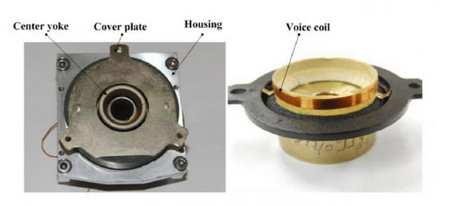
The voice coil is a thin coil inside the subwoofer that does the job of current amplification. If somehow it gets torn, it will stop working. So checking this in the first step will be a good idea and might save you some time as well.
Although you can do a thorough testing to check if your sub is blown but starting with this step will not be a bad idea either.
Start by connecting two points of a multitester to the voice coil. If you see any connection, it means the voice coil is still functioning and the problem is elsewhere. If there was no connection, it means the coil is likely damaged.
If your voice coil seems to be working fine then you should do the next step.
Step 2 – Check speaker suspension
The speaker cone is made of a soft flexible material and sits on top of a suspended base to give it proper suspension as it needs to produce sound. If it’s not in a good shape, it won’t be able to vibrate well and the sound will be damp and crusty.
Check it by pushing the cone inside slowly and then release. If it comes back to normal shape smoothly, it means the flex is not damaged. Now check for any tear around the material. A torn speaker cone will not be of much good.
If it passes both the tear and rigidity test, then you can go for the next step as it means both the voice coil and speaker cone are not likely to be damaged and the problem lies somewhere else.
Step 3 – Uncouple the frame and the speaker
Now that you’re sure that the problem is not from voice coil or speaker cones, you have fewer parts to check. The good thing is it is going to be easier to pinpoint the issue from this step.
Take a screwdriver and remove the bolts holding the speaker on the frame. Afterwards, take the wires that connect the speaker with the power source. Keep the screws in a safe place and also you may want to take a photo of the wiring.
Knowing how to rewire the speaker properly will save you from a lot of headaches as a misconnection here will make the speaker produce distorted sounds. If you are careful with this and the bolts, you’ll have an easy time connecting them again.
Step 4 – Take the surround out
The surround is the main reason your subwoofer sounds like a home theatre. If it’s damaged, you won’t get the deep groove needed to match with those high pitched tweeters.
With a sharp knife or blade, take the glue under the surround slowly. Be careful not to push too hard or you might damage your previously good quality surround system.
The surround is soft and the sides are very brittle. As you push your knife through the sides of it, don’t try to get a lot done quickly. Try to remove the glue little by little and the surround will come off easily.
Step 5 – Take the cone and coil out
After removing the surround from the base, your next task is to get the voice coil along with spider and speaker cones out. Slowly cut the terminal wires and remove the voice coil. While removing spiders, make sure not to damage other parts.
Step 6 – Attach new coil
This is the most crucial part. You have to be very careful in this process.
The voice coil is an ultra thin wire wrapped around to work as a magnetic field and magnify sound. This is the reason that your subwoofer creates a high boost sound.
As this item is delicate, you might want to take things slow and first clean the subwoofer very well. You can clean with a mop but for a better job, a pressure air cleaner will be good to reach the crevices deep within the voice coil hole.
Now, get a new coil and set it in the gap. Get a new spider and a speaker cone. Attach both of them to the speaker with glue and allow a few hours for it to dry. The more time you give, the better it is for the speaker.
Step 7 – Final rewiring and overall check
After setting up the new voice coil, now you should put the speaker frame back with some glue. Let it dry for a few hours until it sets well.
Get the other components in place and with a soldering iron, connect the coil wires to the terminals. Afterwards, put the subwoofer frame to the proper position and connect it with power. It should be working fine now if you did the steps well.
Conclusion
If your subwoofer is in a bad condition, it will have a hard time matching its bass with the fast tweeters. You should give your subwoofer system an overall check from time to time to ensure a proper function.
Whenever you notice something wrong, try following our guide to see if you can fix it. If you can, you may save yourself from spending some dollars by not going to a mechanic. But sometimes, there are severe cases, & a mechanic is needed.


