How To Create A Shopify Store That Actually Sells: A Step-By-Step Guide
Online shopping is fantastic and is one of the most popular online activities worldwide. And from today’s perspective, the potential to make money with online shops is virtually endless.
As the digital boom has seen consistent growth in eCommerce throughout the years, forecasts anticipate that worldwide online sales will reach $6.5 trillion by 2022. That’s why retail shops and individual entrepreneurs are rapidly following the established eCommerce sellers by setting up their own online stores.

Nowadays, doing so has become simpler than at any other point in history, thanks to online shopping platforms like Shopify. One of the best things about Shopify is that the platform permits physical retail stores to make the transition to digital easily. That’s primarily due to Shopify’s POS system that allows them to tie the Shopify backend into the existing retail business and enjoy a smooth integration of inventory and accurate reporting.
The necessary steps you need to take in order to set up your eCommerce store with Shopify are, in fact, very straightforward. In their essence, eCommerce stores are very similar to regular websites, except that they permit users to make direct purchases.
However, not all Shopify stores are created equal, and not all of them generate huge revenues. Read through our step-by-step guide and learn how to create a Shopify store that actually sells.
Register For A Shopify Account And Set Up Your Shopify Store
Shopify offers a 14 day free trial time to all newly registered users. Register your Shopify account and tick on the “start free trial” button to access the Shopify site builder, which will help you create your brand new online store.
The Shopify site builder is pretty straightforward and mirrors the Lego conception. The site builder empowers you to put different site pieces together to work the way you want. There are a couple of methods to establish a Shopify store, either with their pre-built Shopify templates or to create your Shopify store from scratch using Liquid.
The first method uses the pre-existing templates on the platform and offers the ability to modify them to create your unique store. These templates are easily accessible on the Shopify theme store, where you will find 100+ pre-built free and paid templates to select from.
On the other hand, if you’re looking for something more individual and unique, Shopify also offers you the option to design your site from “point zero.” You can do so by using their self-developed PHP language named Liquid, an easy-to-master language that allows you to develop your Shopify store from the ground up.

Photo from Elegant Themes
Attach Products To Your Inventory And Display Them On Your eCommerce Store
Once you register for an account and set your Shopify store up, it’s time to add the products you plan on selling and create an inventory. Like making your Shopify store, there are two modes of adding goods you desire to sell on the platform.
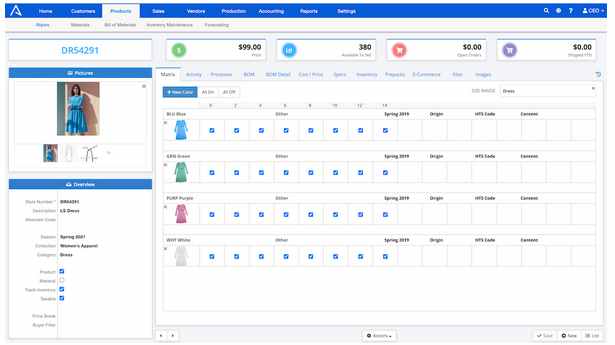
The first way is to add products that you have an inventory of manually. As we mentioned in this article’s introduction, thanks to Shopify’s brilliant POS tools, physical stores can easily integrate their existing ERP software to the platform and enjoy a seamless transition to digital.

Photo from Apparel Magic
To start adding products manually, click on “products” and choose to proceed with the “add product” option. This product section of the platform is an important utility for your eCommerce store because it lets you set collections, vendors, and tags aside from basics like product names and specifications.
The second way of attaching items to your Shopify store would be the dropshipping method. Open the Shopify market and select a dropshipping app such as Spocker, AliExpress Dropshipping, or others. This way, you can search for and add new products to your store directly from the app’s interface.
Once you add your goods to your inventory, it means that they’re effectively saved in the system. However, these products will not be automatically put on your Shopify shop, so you’ll need to go through one more step. Launch your store editor and determine where to add individual products or collections. Whether you’ll display varying collections of products in different sections of the store or you’ll go with an all-in-one catalog – the decision is all yours.
Configure The Payment Methods
Upon adding and displaying the products on your Shopify store, it’s time to reflect on all important eCommerce features. And one of the most important eCommerce features every online store owner needs to think about is determining how you want your buyers to pay for acquisitions made on your website.
Standardly, PayPal is one option for your store, but first, you’ll have to set up a PayPal merchant account if you want to use this paying method. Other than PayPal, you have two additional payment processors you can make use of.
The first one is Shopify payments, which is directly provided by the platform. If you elect to go with this one, Shopify payments allow you to process virtually all payments through your account. Nonetheless, this payment processor can be a bit limited since not all prospective buyers can use it. It’s convenient only to a handful of countries, and there are further constraints on what businesses in which countries can utilize Shopify payments.
You can also do this by utilizing third-party payment processors, but before you do so, make sure that’s available for your area.

Photo by Roberto Cortese from Unsplash
Set Up Your Shipping Parametres And Manage The Shopping Carts
To set up your shipping parameters and patterns, enter “settings” and then select “shipping.” In this window, you can arrange all details regarding shipping from carriers to displaying lists and prices.
You can also create different shipping arrangements to cater to your varying orders regardless of whether they’re domestic or out of your country. Moreover, shipping qualifications can also be set; for instance, what weight of orders obliges what sort of packaging.
To efficiently manage your customers’ shopping carts, from the “settings” menu, select “checkout,” where you can arrange the method through which your clients make their purchase.
For instance, do you want anyone to be able to purchase without an account in your store or not? The checkout section is an essential area of your site that you can utilize not just for revenue generation but also for data capture reasons and other marketing purposes.
Launching Your Shopify Store
Finally, to start your Shopify store, you’ll need to sign up for one of their plans. Naturally, different plans come with different features, so ensure that you thoroughly cover everything and select a plan that will best suit your needs.
Before you go live with your store, add your domain name to Shopify. Just as with any site, you’ll need a domain name by which customers and search engines will find you. To assist you in setting up your store, Shopify will assign you a default domain: www.your-store-name.myshopify.com. However, if you want a more customized URL for better brand recall or better search rankings, you can either buy a domain from Shopify or use a custom domain name that you’ll purchase elsewhere.

Photo by Jacky Chiu from Unsplash
Final Thoughts
In case you’re planning to make any online sales, Shopify is probably the best solution for you. It doesn’t matter if you plan on selling digital goods or physical products; Shopify has you covered. The best part of this eCommerce platform is that you can create and run a professional-looking online store without having to learn a single line of code. Besides, because of its popularity, Shopify has a vibrant online community. If there’s something you want to know or you need truthful answers to Shopify-related topics, ask, and you’ll be very likely to find someone who knows the answer and is willing to share.


