July 28, 2010
Display Sticky Header Bar In WordPress Blog Using CSS Code
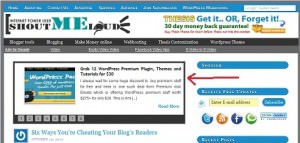
As you can see i added a sticky header bar in my blog, where my readers can see a message. You can also display a similar sticky header bar in your blog. It is so simple and you need to insert a CSS code in your blog to accomplish this. Although a new website HelloBar.com can also do this for you, but you can’t remove the link that goes to hellobar website home page. In order to display a bar manually and control all the codes you can follow this simple tutorial.
Screen Shot

How to Display Sticky Header Bar in Blog?
You can find a simple tutorial for both Thesis and normal wordpress theme. If you are using Thesis 1.8 or any other version then read the first tutorial, and if you are using normal wordpress theme then use the 2nd tutorial to display a sticky header bar.
1. For Thesis Theme Users
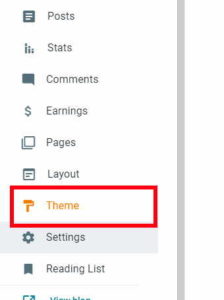
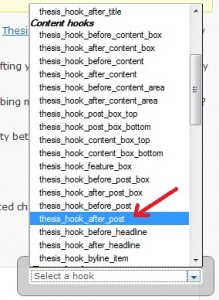
1. If you are using Thesis OpenHook Plugin, then you can easily insert the code in your blog. If not then install thesis open hook plugin and then Go to Dashboard>Apperance>Thesis OpenHook>
Paste the below code in the first box. That is wp_head
<div id="stickybar-container" style="top: 0px;"><span>Join TechMaish, Write Articles and Get Backlinks in Return</span> <a href="https://www.techmaish.com/write-for-us/">Write For Us</a><div id="stickybar-shadow"></div></div>
Make sure you change the information highlighted to the one you want to display.
2. Now open your Custom.css file and paste the below code.
element.style {

top:0;

}

#stickybar-container {

background:none repeat scroll 0 0 #EB583C;

color:#FFFFFF;

font-family:Georgia,Times New Roman,Times,serif;

}

#stickybar-container {

font-size:14px;

font-weight:normal;

height:30px;

line-height:30px;

margin:0;

overflow:visible;

padding:0;

position:relative;

text-align:center;

width:100%;

z-index:1000;

}
Save the file and that’s it.
2. For WordPress Theme Users
1. Go to Dashboard>Appearance>Editor> and open header.php file. In header.php file find the code </head> and paste the below code just before the </head> code.
<div id="stickybar-container" style="top: 0px;"><span>Join TechMaish, Write Articles and Get Backlinks in Return</span> <a href="https://www.techmaish.com/write-for-us/">Write For Us</a><div id="stickybar-shadow"></div></div>
Don’t forget to change the highlighted information.
Save the file.
2. Now open Style.css file and paste the below code at the end of the file.
element.style {

top:0;

}

#stickybar-container {

background:none repeat scroll 0 0 #EB583C;

color:#FFFFFF;

font-family:Georgia,Times New Roman,Times,serif;

}

#stickybar-container {

font-size:14px;

font-weight:normal;

height:30px;

line-height:30px;

margin:0;

overflow:visible;

padding:0;

position:relative;

text-align:center;

width:100%;

z-index:1000;

}
Save the file.
Hope you enjoyed the tutorial. Don’t forget to share it with your friends.

 October 2, 2009
Related Posts

Search Here
5 comments
Hire Web Developer
Hi
thanks for the source code i am using this code and got the desired result.
Sean Brady
Thanks for sharing this information! I found it to be very useful to me!
Bligbook
thanks for the code…
i will try it…..
Bilal Ahmad
Hamza@ You are welcome Hamza
Hamza Tariq
Thank You So much bilal. I’m finding this since i saw on SML.